All-Butter Flaky Pie Crust Recipe
Easy flaky pie crust recipe made with butter for the perfect layers. Use this homemade crust for apple pie, quiche, chicken pot pie, and more.
August 2025 update: I first shared this easy flaky pie crust recipe back in December 2023. This week I still had a ton of heirloom tomatoes and decided to make a quiche, which meant I needed a crust. When I looked back at this post, I realized it could use a refresh. I added more detail, cleaned up the steps, and included some helpful information on when to prebake the crust and when you can skip it. Hopefully this version makes things easier for you in the kitchen.

👩🍳 From Granny’s Flaky Pie Crust Recipe to Mine
My granny made the best apple pies, and I’m convinced the secret was always in her pie crust recipe. Every slice had those flaky layers that melted into buttery perfection. I have no clue how she did it. I was too young to care back then. But then I started to enjoy cooking and baking.
About twelve years ago I decided to figure out how to make the flakiest pie crust. I went down a rabbit hole of pie crust recipes, reading about butter vs shortening, layering techniques, and all the little details that go into a great homemade pie dough recipe. That first attempt hijacked my entire day. Hours of rolling, chilling, and folding finally gave me a buttery crust worthy of any bakery apple pie recipe. It was amazing, but so much work that I swore I’d never put myself through it again. And honestly? I haven’t.
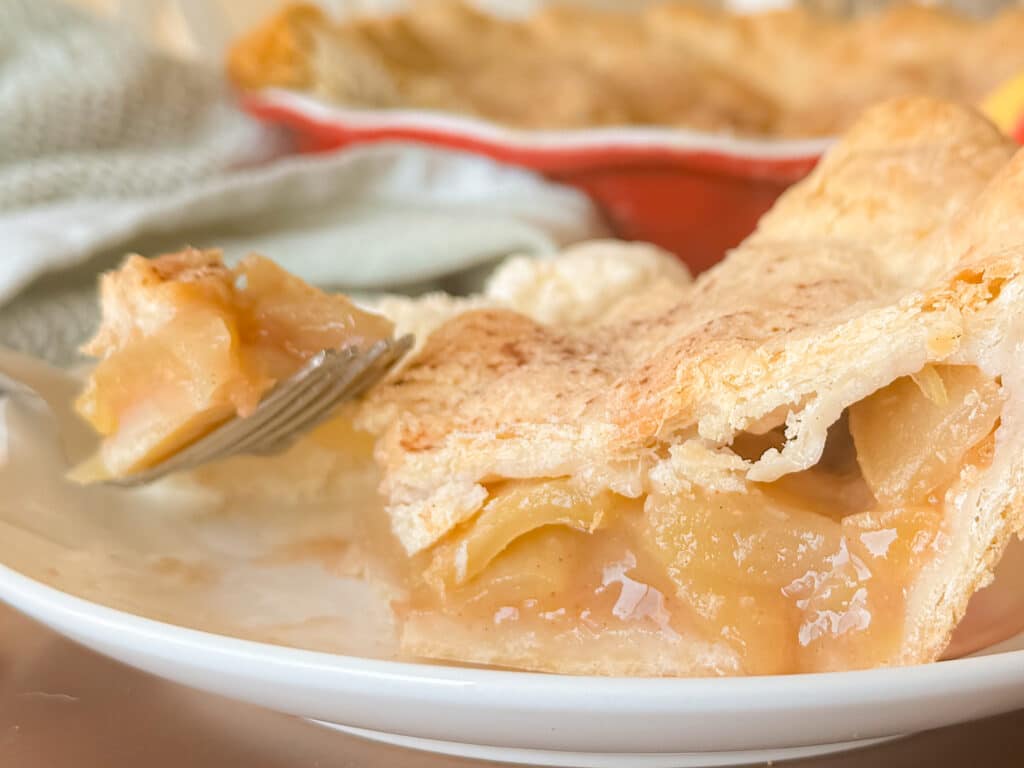
But out of all that I learned a much easier method. Now, I can pull off an easy flaky pie crust recipe in about fifteen minutes worth of work. Sure, the dough needs an hour in the fridge, but that’s nothing compared to the marathon of my first attempt. The best part is that it’s almost as good as the complicated version — golden, buttery, and filled with layers you can peel apart. It’s the kind of homemade butter pie crust that makes an apple pie taste like it came from a bakery, without spending all day in the kitchen.
All it takes is tossing everything into a food processor, hitting the button, and the dough comes together without any heavy lifting. It bakes up into a golden flaky crust that’s light and crisp but sturdy enough to hold a juicy filling. Suddenly, making an apple pie recipe feels easy.
This pie crust works with just about anything. It’s perfect for a classic apple pie, a pumpkin pie recipe during the holidays, or even a savory chicken pot pie when you want comfort food. Once you try it, you’ll see how much easier pie baking can be with a simple, reliable crust like this one.

🛒 What You Need for This All-Butter Pie Crust
🥣 How to Make This Easy Flaky Pie Crust Recipe
Start by adding one and a half cups of flour to a food processor along with the salt and the sugar if you want to use it. Pulse a couple of times to mix it together, then set aside the remaining cup of flour for later. Add the cold butter cubes straight from the fridge because the colder they are, the flakier your crust will be. Pulse ten to twelve times until the mixture looks crumbly with no large pieces of butter left. Add the remaining cup of flour and pulse four or five more times until it is evenly distributed. At this stage the mixture should still look a little crumbly.

Next, add four tablespoons of ice water and pulse a few times. Squeeze a small amount of dough between your fingers to test it. If it holds together, you are good to go. If it still looks dry or falls apart, add one more tablespoon of water at a time and pulse again until it just comes together. Be careful not to add too much water.

Turn the dough out onto a floured surface and bring it together into a ball. Do not knead it, just press it together until it holds. Cut the ball in half, shape each half into a flat disk, wrap them in plastic, and refrigerate for at least an hour. You can refrigerate for a couple of days or freeze for longer if you want to prep ahead. When you are ready to use the dough, let one disk sit at room temperature for about five minutes so it is easier to roll.

Lightly flour your work surface, the dough, and the rolling pin. Roll the dough into a twelve inch circle about one eighth of an inch thick. If you want to check the size, place your pie dish upside down over the dough. You should have at least an inch of dough extending beyond the edges. If the dough sticks as you roll, sprinkle on a little extra flour. To transfer the dough to the dish, roll it loosely around your rolling pin and then unroll it over the plate. Gently press it into the bottom and sides without stretching it.

For a single crust pie, trim the dough so that about half an inch hangs over the sides. If you are making a double crust pie, trim the bottom crust even with the edge of the dish. Add your filling now. For apple pie, fill it generously since the apples will shrink as they bake. For pumpkin pie, fill the dish to just below the rim so it does not spill in the oven.

If you are using a top crust, roll out the second disk and place it over the filling. Trim the dough so that about half an inch hangs past the edge. Fold the top edge underneath the bottom edge to create a thicker border that rests on the lip of the dish. Seal the crust by crimping with your fingers or pressing with your knuckles for a decorative finish. Chill the pie for twenty minutes in the fridge or five minutes in the freezer before baking so the butter firms up again. This step helps create flaky layers in the oven.
Before you bake, cut a few small slits in the top crust to let steam escape. For a golden finish, brush the crust lightly with egg wash made from one beaten egg mixed with a splash of water. Bake according to your pie recipe.

Love this recipe? Spread the love by leaving a star review or dropping a comment below! I’d really love to hear what you think. If this recipe hit the spot for you, you’d be helping me out big time by sharing it on Pinterest or Facebook!
Some of the links on this site are affiliate links, meaning I may earn a commission if you make a purchase through them (It won’t cost you extra, promise). This helps support my work and allows me to continue creating content. Rest assured, I only recommend products I personally use and love. Thank you for your support!

All-Butter Flaky Pie Crust
Equipment
Ingredients
- 2½ cup all-purpose flour
- 1 teaspoon salt
- 1 tbsp sugar (optional)
- 1 cup very cold, unsalted butter (cut into 1/2-inch cubes)
- 6-10 tbsp ice water
Instructions
- In a food processor, combine 1½ cups of flour, 1 teaspoon salt, and 1 tbsp sugar (optional). Pulse 2 to 3 times. Save the remaining cup of flour for later.

- Add 1 cup very cold, unsalted butter cubes to the flour in the processor. Pulse 10-12 times until the dough looks crumbly. Make sure there's no uncoated butter. Add the remaining 1 cup of flour. Pulse 4 to 5 times until the flour is evenly distributed. The dough should look a bit crumbly. Add 4 tablespoons of ice water. Pulse 5 times. If it forms clusters and holds together, it's ready. If not, add more water, one tablespoon at a time, and continue pulsing until it comes together.
- Place dough on a floured surface and work it just enough to form a ball. Cut the ball in half, shape each half into disks, wrap them in plastic, and refrigerate for at least 1 hour. When ready to make your crust, take one of the dough disks from the fridge and let it sit at room temperature for 5 minutes.
- Lightly flour your work surface, the top of the dough, and the rolling pin. Roll out the dough into a 12-inch circle, about 1/8-inch thick. Check for sticking and add a bit of flour as needed. Roll the dough around the rolling pin and unroll it over the dish to transfer. Gently press the dough into the dish, lining the bottom and sides without pulling or stretching.If you're making a single crust, trim the excess dough to within ½-inch of the dish edge, leaving a little extra hanging over. If you're planning to add a top crust, trim the dough right to the edge of the pie plate.
- If you’re making a custard pie, you’ll want to prebake the crust so it doesn’t get soggy. (See recipe notes for a how to know if you should prebake the crust.) After rolling the dough into the dish, line it with parchment paper or foil and fill it with pie weights, dried beans, or even rice to keep the crust from puffing up. Bake at 375°F for about 15 minutes until the edges start to look set. Carefully remove the parchment and weights, then return the crust to the oven for another 8 to 10 minutes until the bottom looks dry and lightly golden. Let it cool before adding your custard filling and finishing the bake.
- Now it’s time to fill your pie! If you're making apple pie, go for a heaping portion of filling since it will cook down during baking. For pumpkin pie, fill it within 1/4 inch of the top to prevent spillage as it expands.
- If you’re adding a top crust, do that now! Trim the edge to within 1/2 inch of the pie edge. Fold the edge of the top crust underneath the bottom edge to create a thicker 1/4-inch border resting on the lip of the dish. Crimp the edges by pressing with your fingers from the inside and your knuckles from the outside for that perfect decorative touch. Finally, if you're using a top crust, remember to cut slits for ventilation! This step allows steam to escape during baking, keeping your crust flaky. For a beautiful golden sheen, brush the crust with an egg wash (a beaten egg mixed with a bit of water) before popping it in the oven.

- If you are using a top crust, refrigerate for at least 20 minutes or freeze for 5 minutes before baking. This step is optional but helps the butter resolidify before you bake it so you are sure to get flaky layers. Bake according to your recipe.


Notes
You do not always need to prebake your pie crust. For custard pies like pumpkin, chocolate, or cream pies where the filling does not bake very long, prebaking keeps the crust crisp instead of soggy. For fruit pies such as apple, cherry, or peach, you can usually skip prebaking because the filling bakes long enough for the crust to cook through. If you are unsure, think about how wet the filling is and how much time it will spend in the oven. The wetter the filling and the shorter the bake time, the more likely it is that prebaking will help.
Storage
To use from the freezer, transfer it to the refrigerator and let it thaw overnight. Once thawed, allow it to sit at room temperature for about 15-30 minutes before unrolling.
Nutrition
FAQs
What makes a pie crust flaky?
A flaky pie crust is achieved through the right combination of cold ingredients, particularly butter, and proper mixing techniques. The cold fat creates steam during baking, resulting in flaky layers.
How do I know if my pie crust dough is too dry?
If your pie crust dough feels crumbly and doesn’t hold together when pinched, it may be too dry. To fix this, gradually add a little more ice water until the dough comes together without being sticky. A well-made dough should hold its shape without crumbling apart.
Why should I chill my pie crust before baking?
Chilling the pie crust allows the gluten to relax, preventing shrinkage during baking. It also ensures that the fat remains cold, which is crucial for achieving that desirable flaky texture.
What type of flour is best for pie crust?
All-purpose flour is typically recommended for making pie crust. It has the right balance of protein content, which provides structure while still allowing for flakiness.
Should I blind bake my pie crust?
Blind baking, or pre-baking your pie crust, is essential for certain fillings like custard or cream pies to prevent a soggy bottom. Use pie weights or dried beans to weigh down the crust while baking to keep it from puffing up.
Best Ways to Use Homemade Pie Crust
This flaky homemade butter pie crust recipe is one of those recipes you’ll keep coming back to because it works with so many different pies. If you’re baking a classic apple pie recipe, the crust bakes golden and crisp, strong enough to hold juicy cinnamon apples without turning soggy. It’s just as good with a pumpkin pie or a pecan pie since the buttery layers balance the sweet, custardy fillings.
It also works beautifully in savory dishes. Try it as the crust for a chicken pot pie and you’ll get that comforting mix of creamy filling with a crisp top. It makes an excellent quiche crust too, sturdy enough for eggs, cheese, and vegetables but still tender when you slice into it.
For something smaller, roll the dough out and cut it into rounds or rectangles for hand pies. Fill them with jam, berries, or even chocolate for a sweet treat, or go savory with meat and cheese. Either way, the crust holds its shape while staying flaky and buttery.
This is a perfect pie crust based on my own trials and tribulations! I hope you enjoy it as much as I do. Everyone needs a go-to pie crust recipe.