
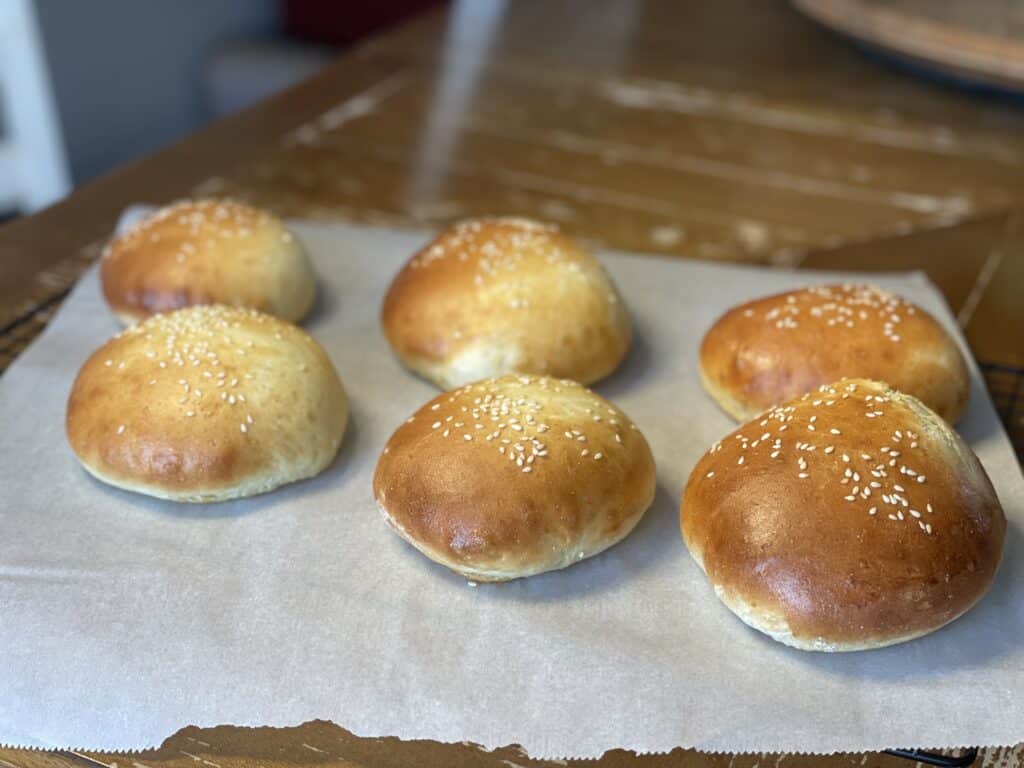
Soft Hamburger Buns
Perfect hamburger Buns are soft yet sturdy, lightly sweet, with a soft interior, toasted exterior, and topped with sesame seeds for added flavor.
October 2025 update: I first shared how I make homemade hamburger buns in April of 2024. In this update, I freshened up the content in my new style. Since this is a recipe for buns I come back to time and again, I got tired of looking at the old format. Hope these work out great for you.

👩🍳Level Up Your Burgers with Homemade Hamburger Buns
The perfect hamburger bun should be soft yet sturdy, with a lightly sweet flavor, a fluffy interior, and a slightly toasted exterior. Sized just right, it balances the juicy burger patty and holds moisture without getting soggy. Sesame seeds can also add an extra layer of texture and flavor.
After countless attempts, I finally nailed this hamburger bun recipe. Early batches were too dense, so I adjusted the milk. Next, I realized it needed more fat, so I added an egg and extra oil. For sweetness, I increased the honey, and voilà! A bun that’s soft, flavorful, and perfect for any burger.
If its sliders you are looking for my slider buns are just as delicious. I hope these level up your burger game!

🛒 Hamburger Buns Ingredients
🥣 Visual Process for Making Homemade Hamburger Buns
Start by blooming the yeast. This step wakes it up and gets it ready to do the heavy lifting in your dough. To bloom it, dissolve the yeast in warm milk with a touch of honey. The sugar gives the yeast something to feed on right away. After about ten minutes, you should see the surface turn foamy and a little frothy. That creamy, bubbly look means the yeast is alive and active. You might also catch a light yeasty smell. All of this is a good sign that it’s going to produce the carbon dioxide your dough needs to rise.

Yeast before Blooming 
Yeast After Blooming


Once the yeast is ready, it’s time to bring in the rest of the ingredients. Mix in an egg, melted butter, and flour. A couple of small details make a big difference here. Yeast loves warm conditions, so it helps if you let your egg sit out for about an hour before using it. That way it won’t cool down the mixture too much. Butter, on the other hand, can hurt yeast if it’s too hot, so let it cool just a bit after melting. You want it warm but not sizzling.
When you add the flour, sprinkle the salt on top of it before mixing everything in. A little salt won’t hurt yeast, but if it comes into direct contact in higher amounts, it can kill it. By layering the salt over the flour first, you make sure it’s evenly distributed before it reaches the yeast. This simple trick keeps the yeast happy and gives your dough the best chance to rise beautifully.
Now it’s time to knead the dough. Kneading isn’t just about making the dough come together—it’s how you build structure. As you knead, the gluten strands develop and stretch, trapping the yeast and helping the dough rise evenly. Plan for 8 to 10 minutes of kneading, or a little longer if you’re working by hand. You’ll know it’s ready when it feels soft, elastic, and springs back when you press it lightly with your finger. If it tears easily, it needs a little more work.
Once the dough feels right, it’s ready for the first proof. Proofing, sometimes called proving or fermentation, is the magic stage where yeast gets busy eating sugars and producing carbon dioxide and alcohol. That gas fills the dough and makes it expand, giving you a lighter and softer texture in the finished bread. To proof, place the dough in a bowl and cover it with a clean kitchen towel. I always leave mine right on the counter in a non-drafty spot. Some people like to put their bowl in the oven with the light on, but I’ve never had better results doing that. A room temperature rise works just fine.
Here’s my little secret—I never oil my bowl before letting the dough rise. Every time I’ve tried, it makes shaping later so much harder. The dough slides around too much, won’t stick to itself, and I end up fighting with misshapen loaves and ugly creases. Skipping the oil keeps the dough easier to handle and shape cleanly. Give the dough 1 to 2 hours here, or until it doubles in size.

Once your dough has puffed up, it’s time to divide and shape it. Cut the dough into 8 to 10 equal pieces.
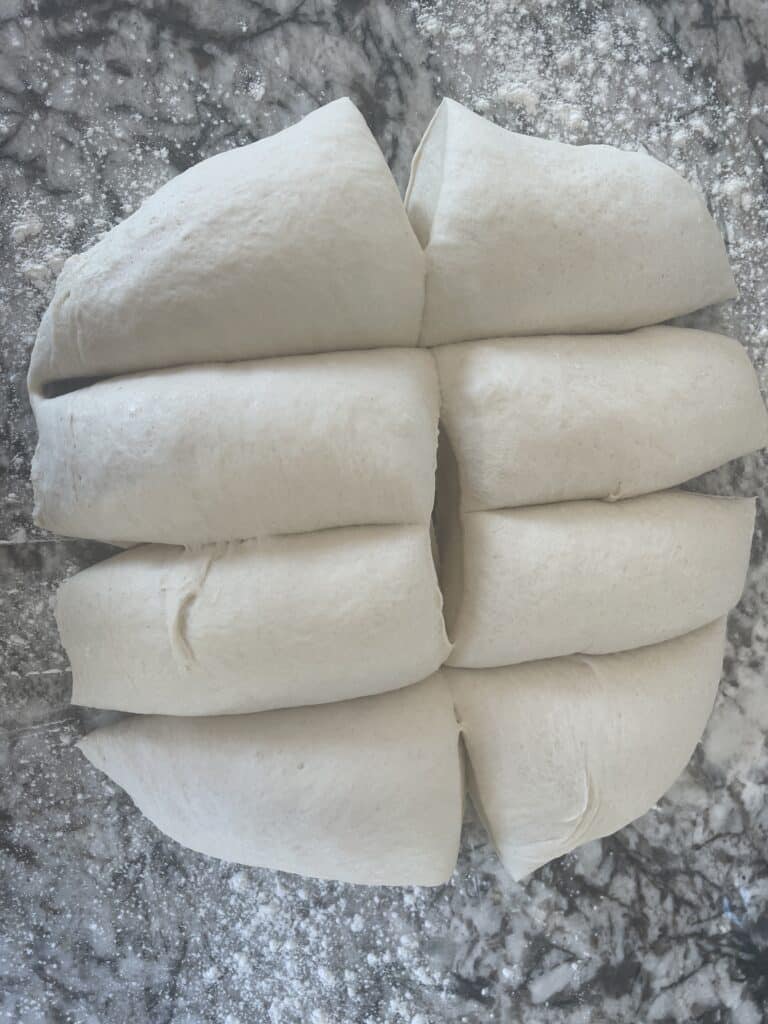
Shaping is simple but important. Take each piece and fold the edges toward the center, pinching them together so the seam seals. Flip it over, then use the palm of your hand to gently round and smooth it into a ball. You’ll want to flatten them more than you think because they’ll rise again before baking and then puff up once more in the oven. If you leave them too tall now, you’ll end up with buns that are all bread and not enough filling.
After shaping, give the buns a second rise. This one is shorter—just about 30 minutes. It gives them a little more volume without overproofing.

Finally, it’s time to bake. Slide the buns into a 375°F oven and bake for about 12 minutes, until they’re lightly golden on top. If you prefer a deeper color and a shinier crust, brush them with an egg wash before baking. Be careful not to overbake—the buns will continue to soften as they cool.

Love this recipe? Spread the love by leaving a star review or dropping a comment below! I’d really love to hear what you think. If this recipe hit the spot for you, you’d be helping me out big time by sharing it on Pinterest or Facebook!
Some of the links on this site are affiliate links, meaning I may earn a commission if you make a purchase through them (It won’t cost you extra, promise). This helps support my work and allows me to continue creating content. Rest assured, I only recommend products I personally use and love. Thank you for your support!

Soft Hamburger Buns
Ingredients
- 2¼ tsp active dry yeast
- ¾ cup warm water
- 2½ tbsp honey
- ½ cup milk
- 1 Large eggs
- 3 tbsp butter – melted
- 4 cups all-purpose flour
- 1¼ tsp salt
- 1 Large eggs (for egg wash)
- 1 tbsp water (for egg wash)
- poppy seeds or herbs (optional, for topping)
Instructions
- In the bowl of a stand mixer add ¾ cup warm water, 2¼ tsp active dry yeast and 2½ tbsp honey. Wait 5-10 minutes until the yeast is bloomed.

- Add ½ cup milk, 1 Large eggs, 3 tbsp butter – melted and 4 cups all-purpose flour. Then sprinkle 1¼ tsp salt over the top. Knead with the dough hook for 8-10 minutes or until the dough comes together and the dough bounces back after being pressed with a finger. Some days it takes more flour then others. If your dough is too sticky, add flour a quarter cup a time until it is. Add slowly because you don't want overly dry dough.
- Form into a ball by pulling the sides underneath and pinching into the dough ball. Cover and let rest in a warm place for 1-2 hours or until doubled in size. NOTE: I do not grease my bowl or the dough before letting it rise because it keeps the dough from forming into buns later.

- Turn dough out onto floured surface and cut into 8-10 equal pieces. Shape each bun by pulling the sides into the center and pinching together. The buns will rise again, so ensure they are not too wide or tall.

- Place a baking dish with 1 inch of water on the bottom rack of the oven.
- Allow dough to rest for 30 minutes while you preheat the oven to 425℉.
- If desired mix 1 Large eggs and 1 tbsp water in a small dish and brush on the tops of each bun. Sprinkle with poppy seeds.
- Bake for 12-15 minutes or until the tops are golden brown. Store in a nylon bread bag for 2-3 days.


Storage
Nutrition
FAQs
How do I get my buns golden brown?
You can apply an egg wash (1 egg to 1 tablespoon water) to the dough before you bake them. This will give them a golden brown tone without making them hard.
How do I make my hamburger buns soft and fluffy?
The key to soft buns is using the right balance of fat (like butter or oil), milk for moisture, and proper kneading. Kneading develops gluten, which gives the dough structure and softness. Also, avoid overbaking, as that can dry out the buns. Letting the dough rise twice, once after mixing and once after shaping, helps make them extra fluffy.
Why didn’t my buns rise properly?
If your buns didn’t rise, your yeast may have been inactive or old. Make sure to bloom the yeast in warm (not hot) liquid before adding it to the dough. Also, make sure your dough is proofed in a warm, draft-free area. Cold conditions can slow down or stop the rising process.
Can I add sesame seeds to the buns?
Yes! After shaping the dough and brushing with egg wash, sprinkle sesame seeds (or other toppings like poppy seeds or everything seasoning) on top before baking.
What can I do if my buns are too dense?
Dense buns can result from over-kneading, not letting the dough rise long enough, or using too much flour. Be sure to let the dough rise until it doubles in size and knead only until the dough becomes soft and elastic. Also, check that your yeast is fresh and active.
Serving Suggestions
These homemade buns are the perfect foundation for all kinds of burgers and sandwiches. If you want something quick but packed with flavor, my Grilled Ranch Turkey Burgers are a great choice. The ranch seasoning brings a zesty kick, and the soft bun soaks up every bit of juice without falling apart.
For a lighter, veggie-forward option, the Zucchini Corn Chicken Burgers are a summer favorite. Fresh zucchini and sweet corn keep the patties tender and juicy, and paired with these buns, they make a balanced meal that feels fresh but filling.
When you’re craving something over the top, the Jalapeño Popper Hamburger is the way to go. The creamy cheese blend and crispy bacon piled on top of a juicy burger are bold enough to need a sturdy bun, and these hold up perfectly.
The Loaded Greek Chicken Burgers add a Mediterranean spin, layered with feta, olives, and red onion. The slight sweetness of the homemade buns balances the briny, salty toppings and makes every bite crave-worthy.
For a classic option with a twist, the Easy Hamburger Recipe with Roasted Garlic is a no-fuss way to enjoy a juicy, flavorful burger. The roasted garlic brings subtle sweetness that pairs beautifully with the golden buns.
And don’t forget sandwiches. The Grilled Chicken Sandwich with Jalapeño Pickle Sauce is smoky, tangy, and a little spicy, and it tastes incredible when tucked inside a fresh bun with crisp lettuce and juicy tomato.
No matter which one you choose, these buns turn burger night into something special.
My Other Buns
The Soft Hamburger Bun is a classic choice for any burger night. These buns are soft yet sturdy, with just the right amount of sweetness and a fluffy interior. Toast them lightly and add sesame seeds on top for that perfect burger shop touch.
For something a little more fun, my Soft, Chewy Pretzel Buns bring a golden brown, glossy crust with that signature pretzel chew. They pair beautifully with bold burgers or even as a base for sandwiches that need a little extra personality.
If you’re making smaller bites, the Slider Buns are buttery, soft, and baked to a golden finish. They’re the perfect size for pulled pork sliders, mini chicken sandwiches, or even breakfast sandwiches.